Chapter 5
Water Quality Conditions
Quality Assurance, Quality Control, and Quality Assessment Measures
Water quality monitoring is defined here as the sampling and analysis of water constituents and
conditions. These may include:
- Introduced pollutants, such as pesticides, metals, and oil
- Constituents found naturally in water that can nevertheless be affected by human
sources, such as dissolved oxygen, bacteria, and nutrients
The magnitude of their effects can be influenced by properties such as pH and temperature. For
example, temperature influences the quantity of dissolved oxygen that water is able to contain,
and pH affects the toxicity of ammonia.
Volunteers, as well as state and local water quality professionals, have been monitoring water
quality conditions for many years. In fact, until the past decade or so (when biological monitoring
protocols were developed and began to take hold), water quality monitoring was generally
considered the primary way of identifying water pollution problems. Today, professional water
quality specialists and volunteer program coordinators alike are moving toward approaches that
combine chemical, physical, and biological monitoring methods to achieve the best picture of
water quality conditions.
Water quality monitoring can be used for many purposes:
- To identify whether waters are meeting designated uses. All states have
established specific criteria (limits on pollutants) identifying what concentrations of chemical
pollutants are allowable in their waters. When chemical pollutants exceed maximum or
minimum allowable concentrations, waters might no longer be able to support the beneficial
uses such as fishing, swimming, and drinking for which they have been designated. Designated uses and the
specific criteria that protect them (along with antidegradation statements say
waters should not be allowed to deteriorate below existing or anticipated uses)
together form water quality standards. State water quality professionals assess water quality by
comparing the concentrations of chemical pollutants found in streams to the criteria in the state's
standards, and so judge whether streams are meeting their designated uses.
Water quality monitoring, however, might be inadequate for determining whether aquatic life
uses are being met in a stream. While some constituents (such as dissolved oxygen and
temperature) are important to maintaining healthy fish and aquatic insect populations, other
factors, such as the physical structure of the stream and the condition of the habitat, play an equal
or greater role. Biological monitoring methods (see Chapter 4) are generally better
suited to determining whether aquatic life is supported.
- To identify specific pollutants and sources of pollution. Water quality
monitoring helps link sources of pollution to a stream quality problem because it identifies
specific problem pollutants. Since certain activities tend to generate certain pollutants (e.g.,
bacteria and nutrients are more likely to come from an animal feedlot than an automotive repair
shop), a tentative link might be made that would warrant further investigation or monitoring.
- To determine trends. Chemical constituents that are properly monitored (i.e.,
consistent time of day and on a regular basis, using consistent methods) can be analyzed for trends over
time.
- To screen for impairment. Finding excessive levels of one or more chemical constituents can
serve as an early warning "screen" of potential pollution problems.
Designing a water quality monitoring program
The first step in designing a water quality monitoring program is to determine the purpose of the
monitoring. This will help you select which parameters to monitor. The program steering
committee should make this decision based on factors such as:
- Types of water quality problems and pollution sources that will likely be encountered
(Table 5.1)
- Cost of available monitoring equipment
- Precision and accuracy of available monitoring equipment
- Capabilities of the volunteers
| Source |
Common Associated Chemical Pollutants |
Table 5.1
Sources and associated pollutants
A volunteer water quality monitoring program should be geared to the types of watershed land uses most often encountered. |
| Cropland |
Turbidity, phosphorus, nitrates, temparature, total solids |
| Forestry harvest |
Turbidity, temperature, total solids |
| Grazing land |
Fecal bacteria, turbidity, phosphorus, nitrates, temperature |
| Industrial discharge |
Temperature, conductivity, total solids, toxics, pH |
| Mining |
pH, alkalinity, total dissolved solids |
| Septic systems |
Fecal bacteria (i.e., Escherichia coli, enterococcis), nitrates, phosphorus, dissolved oxygen/biochemical oxygen demand, conductivity, temperature |
| Sewage treatment plants |
Dissolved oxygen and biochemical oxygen demand, turbidity, conductivity, phosphorus, nitrates, fecal bacteria, temperature, total solids, pH |
| Construction |
Turbidity, temperature, dissolved oxygen and biochemical oxygen demand, total solids, and toxics |
| Urban runoff |
Turbidity, phosphorus, nitrates, temperature, conductivity, dissolved oxygen and biochemical oxygen demand |
Because of the expense and difficulty involved, volunteers generally do not monitor for toxic
substances such as heavy metals and organic chemicals (e.g., pesticides, herbicides, solvents, and
PCBs). They might, however, collect water samples for analysis at accredited labs.
The parameters most commonly monitored by volunteers in streams are discussed in detail in
this chapter. They include stream flow, dissolved oxygen and biochemical oxygen demand,
temperature, pH, turbidity, phosphorus, nitrates, total solids, conductivity, total alkalinity, and
fecal bacteria. Of these, the first five are the most basic and should form the foundation of almost
any volunteer water quality monitoring program.
Relatively inexpensive and simple-to-use kits are available from scientific supply houses to
monitor these pollutants. Many volunteer programs use these kits effectively. Meters and
sophisticated lab equipment may be more accurate, but they are also more expensive, less
flexible (e.g., meters generally have to be read in the field), and require periodic calibration. This
chapter discusses specific equipment and sampling considerations for each parameter, and
usually describes several approaches to monitor them. Table 5.2 lists methods available for
monitoring key parameters, including the preferred testing site (lab or field).
General preparation and sampling considerations
The sections that follow will detail specific sampling and equipment considerations and
analytical procedures for each of the most common water quality parameters. There are,
however, two general tasks that are accomplished anytime water samples are taken. These are
discussed below.
Task 1 Preparation of Sampling Containers
Reused sample containers and glassware must be cleaned and rinsed before the first sampling
run and after each run by following either Method A or Method B described below. The most
suitable method depends on the parameter being measured.
Method A: General Preparation of Sampling Containers
The following method should be used when preparing all sample containers and glassware for
monitoring conductivity, total solids, turbidity, pH, and total alkalinity. Wear latex gloves!
- Wash each sample bottle or piece of glassware with a brush and phosphate-free
detergent.
- Rinse three times with cold tap water.
- Rinse three times with distilled or deionized water.
Method B: Acid Wash Procedure for Preparing Sampling Containers
This method should be used when preparing all sample containers and glassware for monitoring
nitrates and phosphorus. Wear latex gloves!
- Wash each sample bottle or piece of glassware with a brush and phosphate-free
detergent.
- Rinse three times with cold tap water.
- Rinse with 10 percent hydrochloric acid.
- Rinse three times with deionized water.
Task 2 Collecting Samples
In general, sample away from the streambank in the main current. Never sample stagnant water.
The outside curve of the stream is often a good place to sample, since the main current tends to hug this
bank. In shallow stretches, carefully wade into the center current to collect the sample.
A boat will be required for deep sites. Try to maneuver the boat into the center of the main
current to collect the water sample.
When collecting a water sample for analysis in the field or at the lab, follow the steps below.
For Whirl-pak® Bags
- Label the bag with the site number, date, and time.
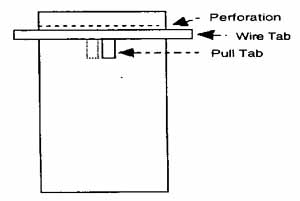
Figure 5.1
Sketch of a Whirl-pak® bag
Volunteers can be easily trained to use these factory-sealed, disposable water sample collection bags.
|
- Tear off the top of the bag along the perforation above the wire tab just prior to
sampling (Fig. 5.1). Avoid touching the inside of the bag. If you accidentally touch the inside of the bag, use another one.
- Wading. Try to disturb as little bottom sediment as possible. In any case, be
careful not to collect water that contains bottom sediment. Stand facing upstream. Collect the
water sample in front of you.
Boat. Carefully reach over the side and collect the water sample on the upstream side of
the boat.
- Hold the two white pull tabs in each hand and lower the bag into the water on your
upstream side with the opening facing upstream. Open the bag midway between the surface and
the bottom by pulling the white pull tabs. The bag should begin to fill with water. You may need
to "scoop" water into the bag by drawing it through the water upstream and away from you. Fill
the bag no more than 3/4 full!
- Lift the bag out of the water. Pour out excess water. Pull on the wire
tabs to close the bag. Continue holding the wire tabs and flip the bag over at least 4-5 times
quickly to seal the bag. Don't try to squeeze the air out of the top of the bag. Fold the ends of the
wire tabs together at the top of the bag, being careful not to puncture the bag. Twist them
together, forming a loop.
- Fill in the bag number and/or site number on the appropriate field data sheet. This is
important! It is the only way the lab coordinator know which bag goes with which site.
- If samples are to be analyzed in a lab, place the sample in the cooler with ice or cold
packs. Take all samples to the lab.
For Screw-cap Bottles
To collect water samples using screw-cap sample bottles, use the following procedures (Fig. 5.2
and 5.3):

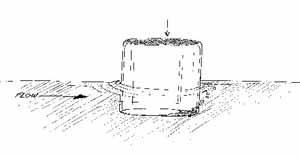
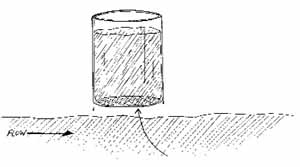
Figure 5.2
Getting into position to take a water sample
Volunteers should sample in the mail current, facing upstream.
|
1.
|
2.
|
3.
|
4.
|
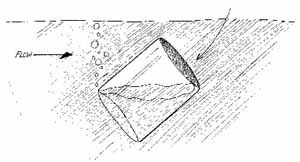
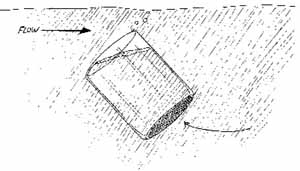
Figure 5.3
Taking a water sample
Turn the bottle into the current and scoop in an upstream direction.
|
- Label the bottle with the site number, date, and time.
- Remove the cap from the bottle just before sampling. Avoid touching the inside of the
bottle or the cap. If you accidentally touch the inside of the bottle, use another one.
- Wading. Try to disturb as little bottom sediment as possible. In any case, be
careful not to collect water that has sediment from bottom disturbance. Stand facing upstream.
Collect the water sample on your upstream side, in front of you. You may also tape your bottle to
an extension pole to sample from deeper water.
Boat. Carefully reach over the side and collect the water sample on the upstream side of
the boat.
- Hold the bottle near its base and plunge it (opening downward) below the water surface.
If you are using an extension pole, remove the cap, turn the bottle upside down, and plunge it
into the water, facing upstream. Collect a water sample 8 to 12 inches beneath the surface or
mid-way between the surface and the bottom if the stream reach is shallow.
- Turn the bottle underwater into the current and away from you. In slow-moving stream
reaches, push the bottle underneath the surface and away from you in an upstream direction.
- Leave a 1-inch air space (Except for DO and BOD samples). Do not fill the bottle
completely (so that the sample can be shaken just before analysis). Recap the bottle carefully,
remembering not to touch the inside.
- Fill in the bottle number and/or site number on the appropriate field data sheet. This is
important because it tells the lab coordinator which bottle goes with which site.
- If the samples are to be analyzed in the lab, place them in the cooler for transport to the
lab.
< Previous · Table of Contents · Next >
Office of Wetlands, Oceans & Watersheds Home
Watershed Protection Home | Monitoring Water Quality Home
EPA Home |
Office of Water |
Search |
Comments
