5.2
Dissolved Oxygen and Biochemical Oxygen Demand
What is dissolved oxygen and why is it important?
The stream system both
produces and consumes
oxygen. It gains oxygen from
the atmosphere and from plants
as a result of photosynthesis.
Running water, because of its
churning, dissolves more oxygen
than still water, such as that in a
reservoir behind a dam.
Respiration by aquatic animals,
decomposition, and various
chemical reactions consume
oxygen.
Wastewater from sewage
treatment plants often contains
organic materials that are
decomposed by
microorganisms, which use
oxygen in the process. (The
amount of oxygen consumed by
these organisms in breaking
down the waste is known as the
biochemical oxygen demand or
BOD. A discussion of BOD
and how to monitor it is
included at the end of this
section.) Other sources of
oxygen-consuming waste
include stormwater runoff from
farmland or urban streets,
feedlots, and failing septic
systems.
Oxygen is measured in its
dissolved form as dissolved
oxygen (DO). If more oxygen is
consumed than is produced,
dissolved oxygen levels decline
and some sensitive animals may
move away, weaken, or die.
DO levels fluctuate seasonally
and over a 24-hour period.
They vary with water
temperature and altitude. Cold
water holds more oxygen than
warm water (Table 5.3) and
water holds less oxygen at
higher altitudes. Thermal
discharges, such as water used
to cool machinery in a
manufacturing plant or a power plant, raise the temperature of water and lower
its oxygen content. Aquatic animals are most vulnerable to lowered DO levels in
the early morning on hot summer days when stream flows are low, water
temperatures are high, and aquatic plants have not been producing oxygen since
sunset.
Temperature
(°C) |
DO
(mg/l) |
Temperature
(°C) |
DO
(mg/l) |
Table 5.3
Maximum dissolved oxygen concentrates vary with temperature |
| 0 |
14.60 |
23 |
8.56 |
| 1 |
14.19 |
24 |
8.40 |
| 2 |
13.81 |
25 |
8.24 |
| 3 |
13.44 |
26 |
8.09 |
| 4 |
13.09 |
27 |
7.95 |
| 5 |
12.75 |
28 |
7.81 |
| 6 |
12.43 |
29 |
7.67 |
| 7 |
12.12 |
30 |
7.54 |
| 8 |
11.83 |
31 |
7.41 |
| 9 |
11.55 |
32 |
7.28 |
| 10 |
11.27 |
33 |
7.16 |
| 11 |
11.01 |
34 |
7.16 |
| 12 |
10.76 |
35 |
6.93 |
| 13 |
10.52 |
36 |
6.82 |
| 14 |
10.29 |
37 |
6.71 |
| 15 |
10.07 |
38 |
6.61 |
| 16 |
9.85 |
39 |
6.51 |
| 17 |
9.65 |
40 |
6.41 |
| 18 |
9.45 |
41 |
6.41 |
| 19 |
9.26 |
42 |
6.22 |
| 20 |
9.07 |
43 |
6.13 |
| 21 |
8.90 |
44 |
6.04 |
| 22 |
8.72 |
45 |
5.95 |
Sampling and Equipment Considerations
In contrast to lakes, where DO levels are most likely to vary vertically in the
water column, the DO in rivers and streams changes more horizontally along
the course of the waterway. This is especially true in smaller, shallower streams. In
larger, deeper rivers, some vertical stratification of dissolved oxygen might
occur. The DO levels in and below riffle areas, waterfalls, or dam spillways are
typically higher than those in pools and slower-moving stretches. If you wanted to
measure the effect of a dam, it would be important to sample for DO behind
the dam, immediately below the spillway, and upstream of the dam. Since
DO levels are critical to fish, a good place to sample is in the pools that fish tend to
favor or in the spawning areas they use.
An hourly time profile of DO levels at a sampling site is a valuable set of
data because it shows the change in DO levels from the low point just before
sunrise to the high point sometime in the midday. However, this might not be
practical for a volunteer monitoring program. It is important to note the time of
your DO sampling to help judge when in the daily cycle the data were collected.
DO is measured either in milligrams per liter (mg/L) or "percent saturation."
Milligrams per liter is the amount of oxygen in a liter of water. Percent
saturation is the amount of oxygen in a liter of water relative to the total amount of
oxygen that the water can hold at that temperature.
DO samples are collected using a special BOD bottle: a glass bottle with
a "turtleneck" and a ground glass stopper. You can fill the bottle directly in the
stream if the stream is wadable or boatable, or you can use a sampler that is
dropped from a bridge or boat into water deep enough to submerse the
sampler. Samplers can be made or purchased.
Dissolved oxygen is measured primarily either by using some
variation of the Winkler method or by using a meter and
probe.
Winkler Method
The Winkler method involves filling a sample
bottle completely with water (no air is left to bias
the test). The dissolved oxygen is then "fixed" using a series of
reagents that form an acid compound that is titrated.
Titration involves the drop-by-drop addition of a
reagent that neutralizes the acid compound and
causes a change in the color of the solution. The
point at which the color changes is the "endpoint" and is
equivalent to the amount of oxygen dissolved in the sample.
The sample is usually fixed and titrated in the field
at the sample site. It is possible, however, to
prepare the sample in the field and deliver it to a lab for
titration.
Dissolved oxygen field kits using the Winkler
method are relatively inexpensive, especially
compared to a meter and probe. Field kits run between
$35 and $200, and each kit comes with enough reagents to
run 50 to 100 DO tests. Replacement reagents are
inexpensive, and you can buy them already
measured out for each test in plastic pillows.
You can also buy the reagents in larger
quantities, in bottles, and measure them out with a
volumetric scoop. The advantage of the pillows is that
they have a longer shelf life and are much less prone to
contamination or spillage. The advantage of buying
larger quantities in bottles is that the cost per
test is considerably less.
The major factor in the expense of the kits is
the method of titration they use eyedropper,
syringe-type titrator, or digital titrator. Eyedropper and
syringe-type titration is less precise than digital titration
because a larger drop of titrant is allowed to pass through
the dropper opening and, on a micro-scale, the
drop size (and thus the volume of titrant) can
vary from drop to drop. A digital titrator or a buret
(which is a long glass tube with
a tapered tip like a pipet)
permits much more precision
and uniformity in the amount of
titrant that is allowed to pass.
If your program requires a high
degree of accuracy and
precision in DO results, use a
digital titrator. A kit that uses an
eye dropper-type or syringe-
type titrator is suitable for most
other purposes. The lower cost
of this type of DO field kit might
be attractive if you are relying
on several teams of volunteers
to sample multiple sites at the
same time.
Meter and Probe
A dissolved oxygen meter is an
electronic device that converts
signals from a probe that is
placed in the water into units of
DO in milligrams per liter. Most
meters and probes also measure
temperature. The probe is filled
with a salt solution and has a
selectively permeable
membrane that allows DO to
pass from the stream water into
the salt solution. The DO that
has diffused into the salt solution
changes the electric potential of
the salt solution and this change
is sent by electric cable to the
meter, which converts the signal
to milligrams per liter on a scale
that the volunteer can read.
DO meters are expensive
compared to field kits that use
the titration method.
Meter/probe combinations run
between $500 and $1,200,
including a long cable to
connect the probe to the meter.
The advantage of a meter/probe
is that you can measure DO and
temperature quickly at any point
in the stream that you can reach
with the probe. You can also
measure the DO levels at a
certain point on a continuous
basis. The results are read
directly as milligrams per liter,
unlike the titration methods, in
which the final titration result
might have to be converted by
an equation to milligrams per
liter.
However, DO meters are more
fragile than field kits, and repairs
to a damaged meter can be costly. The meter/probe must be carefully
maintained, and it must be calibrated before each sample run and, if you are doing
many tests, in between samplings. Because of the expense, a volunteer
program might have only one meter/probe. This means that only one team of
samplers can sample DO and they will have to do all the sites. With field kits, on
the other hand, several teams can sample simultaneously.
Laboratory Testing of Dissolved Oxygen
If you use a meter and probe, you must do the testing in the field; dissolved
oxygen levels in a sample bottle change quickly due to the decomposition of
organic material by microorganisms or the production of oxygen by algae
and other plants in the sample. This will lower your DO reading. If you are using a
variation of the Winkler method, it is possible to "fix" the sample in the field
and then deliver it to a lab for titration. This might be preferable if you are
sampling under adverse conditions or if you want to reduce the time spent
collecting samples. It is also a little easier to titrate samples in the lab, and
more quality control is possible because the same person can do all the titrations.
How to collect and analyze samples
The procedures for collecting and analyzing samples for dissolved oxygen
consist of the following tasks:
TASK 1 Prepare before leaving for the sampling site
Refer to section 2.3 - Safety Considerations for details on confirming sampling date and time,
safety considerations, checking supplies, and checking weather and directions. In
addition to the standard sampling equipment and apparel, when sampling for
dissolved oxygen, include the following equipment:
If Using the Winkler Method
- Labels for sample bottles
- Field kit and instructions for DO testing
- Enough reagents for the number of sites to be tested
- Kemmerer, Van Dorn, or home-made sampler to collect deep-water samples
- A numbered glass BOD bottle with a glass stopper (1 for each site)
- Data sheet for dissolved oxygen to record results
If Using a Meter and Probe
- DO meter and probe (electrode) (NOTE: Confirm that the meter has been calibrated according
to the manufacturer's instructions.)
- Operating manual for the meter and probe
- Extra membranes and electrolyte solution for the probe
- Extra batteries for the meter
- Extension pole
- Data sheet for dissolved oxygen to record results
TASK 2 Confirm that you are at the proper location
The directions for sampling should provide specific information about the exact point in the
stream from which you are to sample; e.g., "approximately 6 feet out from the large boulder
downstream from the west side of the bridge." If you are not sure you are in the exact spot, record
a detailed description of where you took the sample so that it can be compared to the actual site
later.
TASK 3 Collect samples and fill out the field data sheet
Winkler Method
Use a BOD bottle to collect the water sample. The most
common sizes are 300 milliliters (mL) and 60 mL. Be sure that
you are using the correct volume for the titration method
that will be used to determine the amount of DO. There is
usually a white label area on the bottle, and this may already be
numbered. If so, be sure to record that number on the field data
sheet. If your bottle is not already numbered, place a label on
the bottle (not on the cap because a cap can be inadvertently
placed on a different bottle) and use a waterproof marker to
write in the site number.
If you are collecting duplicate samples, label the duplicate
bottle with the correct code, which should be determined
prior to sampling by the lab supplying the bottles. Use the
following procedure for collecting a sample for titration by the
Winkler method:
- Remember that the water sample must be collected in
such a way that you can cap the bottle while it is still submerged.
That means that you must be able to reach into the water with
both arms and the water must be deeper than the sample
bottle.
- Carefully wade into the stream. Stand so that you are
facing one of the banks.
- Collect the sample so that you are not standing upstream
of the bottle. Remove the cap of the BOD bottle. Slowly lower
the bottle into the water, pointing it downstream, until the
lower lip of the opening is just submerged. Allow the water to
fill the bottle very gradually, avoiding any turbulence (which
would add oxygen to the sample). When the water level in the bottle has
stabilized (it won't be
full because the bottle is tilted), slowly turn the
bottle upright and fill it completely. Keep the bottle
under water and allow it to overflow for 2 or 3
minutes to ensure that no air bubbles are trapped.
- Cap the bottle while it is still submerged. Lift it
out of the water and look around the "collar" of the
bottle just below the bottom of the stopper. If you
see an air bubble, pour out the sample and try
again.
- "Fix" the sample immediately following the
directions in your kit:
- Remove the stopper and add the fixing reagents
to the sample.
- Immediately insert the stopper so air is not
trapped in the bottle and invert several times to
mix. This solution is caustic. Rinse your hands if
you get any solution on them. An orange-brown
flocculent precipitate will form if oxygen is present.
- Wait a few minutes until the floc in the solution
has settled. Again invert the bottle several times
and wait until the floc has settled. This ensures
complete reaction of the sample and reagents. The
sample is now fixed, and atmospheric oxygen can
no longer affect it. If you are taking the sample to the lab for titration, no further action is necessary. You can store the sample in a cooler for up to 8 hours
before titrating it in a lab. If you are titrating the sample in the field, see Task 4: Analyze the Samples.
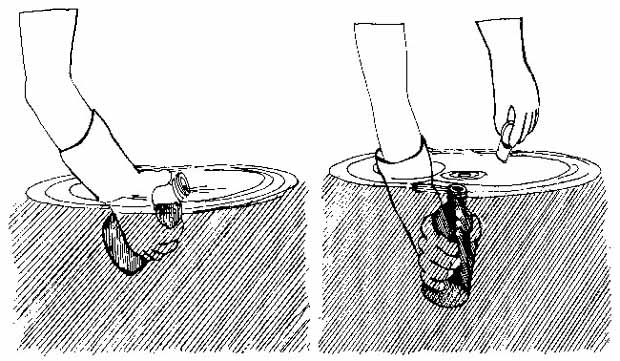
Figure 5.7
Taking a water sample for DO analysis
Point the bottle downstream and fill gradually. Cap underwater when full.
|
Using a DO Meter
If you are using a dissolved oxygen meter, be sure that it is calibrated immediately prior to use. Check the cable connection between the probe and the meter. Make sure that the probe is filled with electrolyte
solution, that the membrane has no wrinkles, and that there are no bubbles trapped on the face of the membrane. You can do a field check of the meter's accuracy by calibrating it in saturated air according to th
e manufacturer's
instructions. Or, you can measure a water sample
that is saturated with oxygen, as follows.
(NOTE: You can also use this procedure for testing
the accuracy of the Winkler method.)
- Fill a l-liter beaker or bucket of tap water. (You may want to bring a gallon jug with water in it for this purpose.) Mark the bottle number as "tap" on the lab sheet.
- Pour this water back and forth into another beaker 10 times to saturate the water with oxygen.
- Use the meter to measure the water temperature
and record it in the water temperature column on the field data sheet.
- Find the water temperature of your "tap" sample in Table 5.3. Use the meter to compare the
dissolved oxygen concentration of your sample with the maximum concentration at that
temperature in the table. Your sample should be within 0.5 mg/L. If it is not, repeat the check and
if there is still an error, check the meter's batteries and follow the troubleshooting procedures in
the manufacturer's manual.
Once the meter is turned on, allow 15 minute equilibration before calibrating. After calibration,
do not turn the meter off until the sample is analyzed. Once you have verified that the meter is
working properly, you are ready to measure the DO levels at the sampling site.
You might need an extension pole (this can be as simple as a
piece of wood) to get the probe to the proper sampling point.
Simply secure the probe to the end of the extension pole. A
golfer's ball retriever works well because it is collapsible and
easy to transport. To use the probe, proceed as follows:
- Place the probe in the stream below the surface.
- Set the meter to measure temperature, and allow the
temperature reading to stabilize. Record the temperature on the
field data sheet.
- Switch the meter to read dissolved oxygen.
- Record the dissolved oxygen level on the field data sheet.
TASK 4 Analyze the samples
Three types of titration apparatus can be used with the
Winkler method: droppers, digital titrators, and burets. The
dropper and digital titrator are suited for field use. The buret is
more conveniently used in the lab (Fig. 5.8) Volunteer
programs are most likely to use the dropper or digital titrator.
For titration with a dropper or syringe, which is relatively
simple, follow the manufacturer's instructions. The
following procedure is for using a digital titrator to determine the
quantity of dissolved oxygen in a fixed sample:
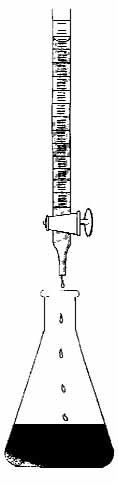
Figure 5.8
Titrating a DO sample using a buret
|
- Select a sample volume and sodium thiosulfate titration
cartridge for the digital titrator corresponding to the expected
dissolved oxygen concentration according to Table 5.4. In most
cases, you will use the 0.2 N cartridge and the 100-mL
sample volume.
- Insert a clean delivery tube into the titration cartridge.
- Attach the cartridge to the titrator body.
- Hold the titrator with the
cartridge tip up. Turn the
delivery knob to eject air and a
few drops of titrant. Reset the
counter to 0 and wipe the tip.
- Use a graduated cylinder to
measure the sample volume
(from the "fixed" sample in the
300-mL BOD bottle) according
to Table 5.4.
- Transfer the sample into a
250-mL Erlenmeyer flask, and
place the flask on a magnetic
stirrer with a stir bar. If you are
in the field, you can manually
swirl the flask to mix.
- Place the delivery tube tip
into the solution and turn the
stirrer on to stir the sample
while you're turning the delivery
knob.
- Titrate to a pale yellow color.
- Add two dropperfuls of
starch indicator solution and
swirl to mix. A strong blue color
will develop.
- Continue to titrate until the
sample is clear. Record the
number of digits required. (The
color might reappear after
standing a few minutes, but this
is not a cause for concern. The
"first" disappearance of the blue
color is considered the
endpoint.)
- Calculate mg/L of DO =
digits required X digit multiplier
(from Table 5.4).
- Record the results in the
appropriate column of the data
sheet.
Some water quality standards
are expressed in terms of
percent saturation. To calculate
percent saturation of the sample:
- Find the temperature of your
water sample as measured in
the field.
- Find the maximum
concentration of your sample at
that temperature as given in
Table 5.3.
- Calculate the percent
saturation, by dividing your
actual dissolved oxygen by the
maximum concentration at the
sample temperature.
- Record the percent saturation in the appropriate
column on the data sheet.
Expected
Range |
Sample
Volume |
Titration
Cartridge |
Digit
Multiplier |
Table 5.4
Sample volume selection and corresponding values for Winkler titration |
| 1-5 mg/L |
200 mL |
0.2 N |
0.01 |
| 2-10 mg/L |
100 mL |
0.2 N |
0.02 |
| 10+ mg/L |
200 mL |
2.0 N |
0.10 |
TASK 5 Return the samples and the field data sheets to the lab/drop-off point
If you are using the Winkler method and delivering the samples to a lab for titration, double-check to make sure that you have recorded the necessary information for each site on the field data sheet, especially the bottle number and corresponding site nu
mber and the times the samples were collected. Deliver your samples and field data sheets to the lab. If you have already obtained the dissolved oxygen results in the field, send the data sheets to your sampling coordinator.
What is biochemical oxygen demand and why is it important?
Biochemical oxygen demand, or BOD, measures the
amount of oxygen consumed by microorganisms in
decomposing organic matter in stream water. BOD
also measures the chemical oxidation of inorganic
matter (i.e., the extraction of oxygen from water via chemical
reaction). A test is used to measure the amount of oxygen
consumed by these organisms during a specified period of time (usually 5 days at 20 C). The
rate of oxygen consumption in a stream is affected by a number of variables: temperature, pH,
the presence of certain kinds of microorganisms, and the type of organic and inorganic material
in the water.
BOD directly affects the amount of dissolved oxygen in rivers and streams. The greater the
BOD, the more rapidly oxygen is depleted in the stream. This means less oxygen is available to
higher forms of aquatic life. The consequences of high BOD are the same as those for low
dissolved oxygen: aquatic organisms become stressed, suffocate, and die.
Sources of BOD include leaves and woody debris; dead plants and animals; animal manure;
effluents from pulp and paper mills, wastewater treatment plants, feedlots, and food-processing
plants; failing septic systems; and urban stormwater runoff.
Sampling Considerations
BOD is affected by the same factors that affect dissolved oxygen (see above). Aeration of stream
water by rapids and waterfalls, for example will accelerate the decomposition of organic and
inorganic material. Therefore, BOD levels at a sampling site with slower, deeper waters might be
higher for a given volume of organic and inorganic material than the levels for a similar site in
highly aerated waters.
Chlorine can also affect BOD measurement by inhibiting or killing the microorganisms that
decompose the organic and inorganic matter in a sample. If you are sampling in chlorinated
waters, such as those below the effluent from a sewage treatment plant, it is necessary to
neutralize the chlorine with sodium thiosulfate. (See APHA, 1992.)
BOD measurement requires taking two samples at each site. One is tested immediately for dissolved oxygen, and the second is incubated in the
dark at 20 C for 5 days and then tested for the amount of
dissolved oxygen remaining. The difference in oxygen levels
between the first test and the second test, in milligrams per liter
(mg/L), is the amount of BOD. This represents the amount of
oxygen consumed by microorganisms to break down the
organic matter present in the sample bottle during the
incubation period. Because of the 5-day incubation, the tests
should be conducted in a laboratory.
Sometimes by the end of the 5-day incubation period the
dissolved oxygen level is zero. This is especially true for rivers
and streams with a lot of organic pollution. Since it is not
known when the zero point was reached, it is not possible to tell
what the BOD level is. In this case it is necessary to dilute the
original sample by a factor that results in a final dissolved
oxygen level of at least 2 mg/L. Special dilution water should be
used for the dilutions. (See APHA, 1992.)
It takes some experimentation to determine the appropriate
dilution factor for a particular sampling site. The final result is
the difference in dissolved oxygen between the first
measurement and the second after multiplying the second result
by the dilution factor. More details are provided in the
following section.
How to Collect and Analyze Samples
The procedures for collecting samples for BOD testing consist
of the same steps described for sampling for dissolved oxygen
(see above), with one important difference. At each site a
second sample is collected in a BOD bottle and delivered to the
lab for DO testing after the 5-day incubation period. Follow
the same steps used for measuring dissolved oxygen with
these additional considerations:
- Make sure you have two BOD bottles for each site you will sample. The bottles should be black to prevent photosynthesis. You can wrap a clear bottle with black electrician's tape if you do not have a bottle with black or brown glass.
- Label the second bottle (the one to be incubated) clearly so that it will not be mistaken for the first bottle.
- Be sure to record the information for the second bottle on the field data sheet.
The first bottle should be analyzed just prior to storing the second sample bottle in the dark for 5 days at 20 C. After this time, the second bottle is tested for dissolved oxygen using the same method that was used for the first bottle. The BOD i
s expressed in milligrams per liter of DO using the following equation:
DO (mg/L) of first bottle
- DO (mg/L) of second bottle
= BOD (mg/L)
References
APHA. 1992. Standard methods for the examination of water and wastewater. 18th ed. American Public Health Association, Washington, DC.
< Previous · Table of Contents · Next >
Office of Wetlands, Oceans & Watersheds Home
Watershed Protection Home | Monitoring Water Quality Home
EPA Home |
Office of Water |
Search |
Comments
