|
Preparation
of Solutions, Part 2
Source: General Chemistry Lab,
St. Mary's College of Maryland
The Volumetric
Flask
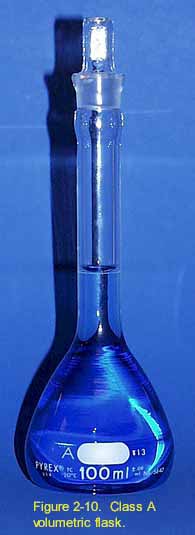 Volumetric
flasks are commonly used in solution preparation. To use one correctly,
you must know how the volumetric flask has been calibrated. It is normally
calibrated to contain (TC) a stated volume of liquid (known
to four significant figures) at a stated temperature (usually 20 oC).
When it is properly filled, the bottom of the meniscus should be level
with the calibration line on the flask. This will ensure that the flask
contains the specified volume. Some flasks are also calibrated to deliver
(TD) a specific volume, however, this application is less commonly
used. When the flask is properly filled to the TD calibration mark, it
will deliver the specified volume to another container. (See Figure
2-10.) Volumetric
flasks are commonly used in solution preparation. To use one correctly,
you must know how the volumetric flask has been calibrated. It is normally
calibrated to contain (TC) a stated volume of liquid (known
to four significant figures) at a stated temperature (usually 20 oC).
When it is properly filled, the bottom of the meniscus should be level
with the calibration line on the flask. This will ensure that the flask
contains the specified volume. Some flasks are also calibrated to deliver
(TD) a specific volume, however, this application is less commonly
used. When the flask is properly filled to the TD calibration mark, it
will deliver the specified volume to another container. (See Figure
2-10.)
Preparation
of an Aqueous Solution Using a Pure Solid Solute
- Properly clean a volumetric
flask that has the desired volume (See Cleaning
Laboratory Glassware.) and add distilled water until the flask
is about half-full.
- Using a plastic weighing
dish or watch glass, weigh out the calculated amount of solute to within
0.01 g or better.
- Quantitatively transfer
the solid to the flask by using a funnel to guide the solid into the
flask, or alternatively, fold the corners of a weigh boat into a pouch
and pour the solid directly into the flask.
- Rinse the residual solid
from the weigh boat or watch glass and funnel into the flask with several
portions of distilled water. This will ensure that all the solid is
transferred to the volumetric flask. Wash down the neck of the flask
and swirl the solution until the solid is dissolved.
- Add distilled water until
the level of the liquid almost reaches the mark on the flask.
- Stopper the flask and hold
the stopper firmly in place while you invert the flask to mix the solution.
Mix the solution for at least three minutes to ensure thorough mixing.
Let the flask stand for about 30 seconds (until the water drains down
the sides of the flask).
- Carefully add distilled
water with a dropper or wash bottle until the bottom of the meniscus
is level with the calibration line on the flask. Invert and swirl again
for a few seconds.
- Transfer the solution to
a clean, dry, plastic bottle. If the bottle
is not dry, rinse the bottle with small increments of 10-20 mL of the
solution. Discard the rinse solution and then transfer the bulk of the
solution to the bottle.
- Label the bottle with the
name and concentration of the reagent, the date, and your initials.
Using this method, the concentration of the reagent is known at least
to two or three significant figures.
Quantitative
Dilution of a Standardized Reagent
- Calculate the volume of
standard reagent needed to make the dilute solution.
- Add distilled water to
the appropriate volumetric flask until it is about half-full.
- Use a pipet of appropriate
size to transfer the required amount of standard to the volumetric flask.
- Next, add distilled water
until the level of the liquid almost reaches the calibration line on
the flask.
- Stopper the flask and hold
the stopper firmly in place while you invert the flask to mix the solution.
Mix for at least three minutes to ensure thorough mixing. Let the flask
stand for about 30 seconds (until the water drains down the sides of
the flask).
- Carefully add distilled
water with a dropper or a wash bottle until the bottom of the meniscus
is level with the calibration line on the flask. Invert and swirl again
for a few seconds.
- Transfer the solution to
a clean, dry, plastic bottle. If the bottle is not dry, rinse the bottle
with small increments of 10-20 mL of the solution. Discard the rinse
solution and then transfer the bulk of the solution to the bottle.
- Label the bottle
with the name and concentration of the reagent, the date, and your initials.
Using this method, the concentration of the reagent is known at least
to three or four significant figures.
Approximate
Dilution of a Concentrated Reagent
 Concentrated
reagents such as acids have approximate concentrations, and therefore, do
not require quantitative dilution. Concentrated
reagents such as acids have approximate concentrations, and therefore, do
not require quantitative dilution.
- Measure the calculated
volume of concentrated reagent in a graduated cylinder.
- Add distilled water to
a clean, but not necessarily dry, plastic bottle of appropriate size
until it is about half-full.
- Next, slowly
pour the concentrated reagent from the cylinder into the bottle. (See
sidebar Handling Chemical Reagents.) Remember,
concentrated acid is always added to a large volume of water to avoid
spattering of the solution.
- Swirl the contents of the
bottle and add distilled water until the level of the solution reaches
the rim of the bottle just below the neck. Hold the cap of the bottle
in place and invert the bottle to mix the contents. Mix for at least
three minutes to ensure thorough mixing.
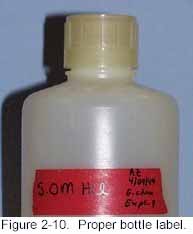
- Label
the bottle (see Figure 2-9)
with the name and concentration of the reagent, the date, and your initials.
Using this method, the concentration of the reagent is known to only
one significant figure.

Reprinted from:

|