| |
|||
|
|
|
Related Products: Society for Amateur Scientists
|
![]() Sponsored by:
Sponsored by:

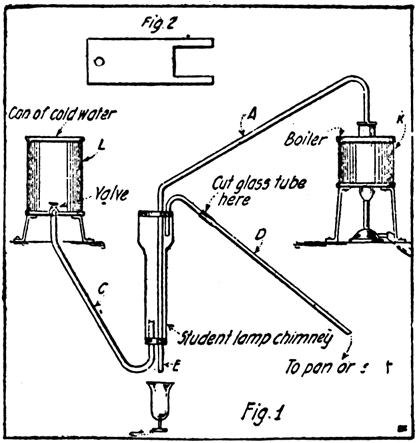
Home-made Distilling Apparatusby Sidney Gernsback The accompanying sketch illustrates a home-made Distilling Apparatus. The condenser is made from a student lamp chimney. Insert a cork at both ends and bore them for glass tubing. Tube A should extend straight through the condenser; tube D should extend about an inch below the cork. I found that if tube D is cut off about four inches below the bend and a long piece of rubber tubing used instead of a long glass one it would cost less and be more serviceable. Tube C should extend about 1 inch above the bottom cork. The condenser is held in place by a piece of wood, shaped as in Fig. 2, fastened on a shelf above the bench.
The boiler K is an empty coffee can. A hole is cut in the cover and the neck of an empty maple syrup can is soldered over it. The cover is then soldered on the can so that the steam cannot escape. Three pieces of tin are next soldered on to form a support. Another can L is fitted with a small faucet which can be obtained from an old gas jet. This can is supported on legs like the boiler. Care should be taken that the bottom of the can L is on a level or higher than the top of the condenser. When the water boils in can K, the steam passes through tube A. The faucet on can L is turned on; cold water flows through a tube C and circulates through the condenser and flows out through tube D into a sink or a large pan. The distillate is caught at E. If, when the water is turned on, the lower cork leaks some melted paraffin should be poured slowly into the tube and allowed to harden. This may be done on both sides of the lower cork. If anything besides water is
to be distilled a glass flask must be used instead of can K. Reprinted from:
|