|
The following is Core Activity 7.1 from the HOA
curriculum and is titled Observing Your First
Variable Star - Delta Cephei. It takes the
lessons learned with 6.2 about interpolation and
applies them to actual observations of the night
sky.
From most latitudes in the northern hemisphere
in the autumn, delta Cephei is bright and high
in the sky - away from the horizon and local
light pollution. It is outside the Milky Way and
in a fairly dark and uncluttered region of the
sky.
 |
- Enter in your logbook the name of the star
(delta Cephei), the date of the observing
session, and the hour (later you will enter
the minutes to the nearest quarter hour).
- Using your planisphere or star charts, find
the Big Dipper and Polaris using the
pointer stars.
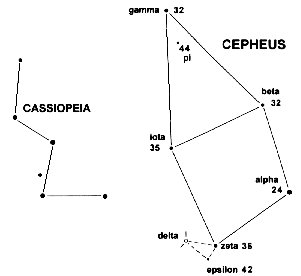
- "Star hop" to Cassiopeia and then to
Cepheus (see above).
- Find the group of three stars near one
corner of the rectangular portion of
Cepheus. Here is delta Cephei and its
comparison stars, zeta Cephei (magnitude
3.6) and epsilon Cephei (magnitude 4.2).
This is the most difficult part and may
take you several attempts, as you
alternately look at the chart (above) and
the sky.
- Using averted vision, observe the variable
star and its comparison stars at the center
of your field of view. Averted vision is a
technique in which you orient the star at
the center of your field of view, and then
gaze at the edge of the field. Peripheral
vision is more sensitive to black and
white, so the difference in magnitude will
be easier to discern.
- Estimate your variable star's magnitude to
the nearest tenth by using the nearby
comparison stars. Look quickly back and
forth and ask yourself: Is it dimmer or
brighter than this comparison star? Is it
dimmer or brighter than the second
comparison star? If it is brighter, by how
many tenths? Make a note of it. Then
estimate the magnitude of your variable
star again, and do it a third time. Enter
the three numbers and average them in your
logbook; then record your result in the
data table.
- Record the names and magnitudes of the
comparison stars used.
- Record the time of your observation to the
nearest quarter hour.
- Place a colon [:] after your observation if
you are unsure of your observations due to
a bright Moon or possible cirrus clouds. Do
not be discouraged if you initially cannot
tell the difference between a star of 3.0
and 3.5 in magnitude. Remember, your
observations are a valuable "part of the
whole" even if you are not yet an expert
observer. With experience, you will be able
to make your observations much more
accurately and quickly.
The lesson then continues by teaching the
students how to convert their date and time of
observations into a Julian Date (abbreviated
"JD"). JD is the time used by most astronomers
and is much different than our normal methods of
telling time. A day in JD begins and ends at
noon, not midnight.
|
![[HOA Logo]](hoa_shield.gif)